Showing posts with label Guest Post. Show all posts

Monday, September 16, 2013

Paleo Crepes with Plumcot-Pear Filling

Hi everyone! I'm Megan and I blog at Freckled Italian, where I write about food, personal style, and daily life. I also own a small business called Cave Girl Consulting, which is focused on all things Paleo. I thought I'd share a recipe with you today!
I know. You're confused. Paleo crepes? Plumcots? Let's start with plumcots. They're a hybrid of a plum and an apricot. I had never heard or even dreamed of them until I saw them at Trader Joe's this summer. We gave them a try and now buy them by the dozen. They're delicious and tart and sweet and the most gorgeous color. See if you can find some. (If not, you could use regular plums for this recipe.)

The truth about being Paleo is that sometimes, you just can't eat another fried egg. Or a scrambled one. Or an omelet. And definitely not another hard-boiled one. It's just too much. So we make Paleo-friendly versions of our favorite carby breakfasts. Like pancakes, or muffins. Or crepes. When I came across this recipe, I knew I needed to try it. I actually made a special trip to the grocery store to pick up more eggs and some almond flour. The fruit filling just kind of happened on its own, with ingredients I already had in the kitchen.

My grandma Angelica wasn't the most gifted of cooks, but she had three signature dishes (all of them were served with a sprinkle of sugar--she also wasn't the healthiest of cooks): Arroz con Leche, saltine crackers with butter, and crepes. My brother, my cousin Ashley, and I grew up referring to crepes as "Grandma Pancakes," and the name kind of stuck. I don't think Grandma would mind knowing that I updated her recipe a bit. Ashley is visiting me in Minneapolis next month and I can't wait to make these for her. You can try them, too.
Ingredients
For the crepes
Five eggs
Three tablespoons almond flour
Two tablespoons arrowroot powder
One teaspoon vanilla extract
One teaspoon cinnamon
A pinch of salt
Coconut oil to grease pan

For the fruit filling
Two or three plumcots
One large pear
The zest and juice of half a lemon
Two tablespoons of honey (optional)

1. Heat a medium-sized pan on the stove and whisk eggs in a bowl. Add remaining crepe ingredients.
2. Spread coconut oil around the pan and add a couple spoonfuls of crepe batter. Spread batter around and let cook.
3. Flip the crepe (this should be really easy to do) and let cook on the other side (about a minute). 
4. Transfer to a plate and repeat with remaining batter.
5. Dice up the plumcots and the pear and put them in a saucepan over medium-high heat.
6. Stir and let cook until the fruit begins to break down into a thick consistency and start to bubble.
7. Zest half of a lemon over the pot and then squeeze the juice, as well. Stir.
8. Add honey and stir. Bring to a boil and then simmer for about ten minutes.
To serve this dish, take a crepe, add a couple spoonfuls of filling to the middle, roll it up, and enjoy!

Wednesday, September 4, 2013

DIY Cat Toe Flats by Cat & Bot

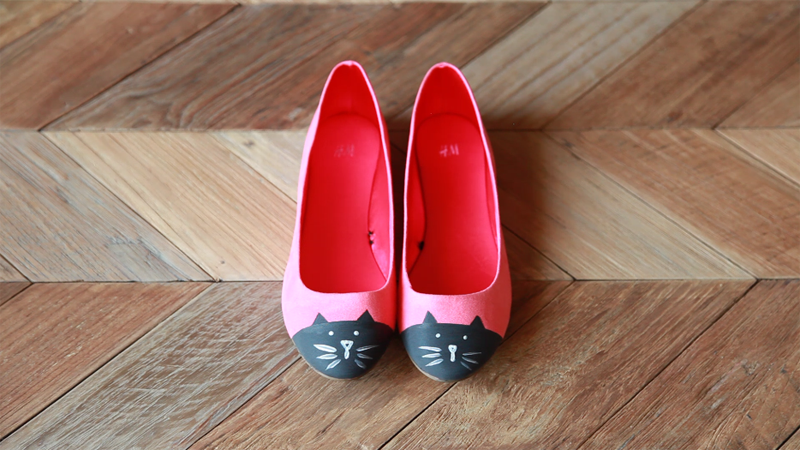
Greetings JAA readers! My name is Cathy and I blog over at Cat & Bot. I'm also a jewelry designer and content creator. Cap toe shoes are a big trend this year and the Internet loves cats. What do you get when you combine the two? Cat toe shoes-- or in this case, cat toe flats :)
 photo 9_zps7191c5c7.png
Here's what you'll need:
  1. A pair of flats (preferably with a round-toe)
  2. Black and white fabric paint
  3. Artist tape
  4. Large and small paint brushes
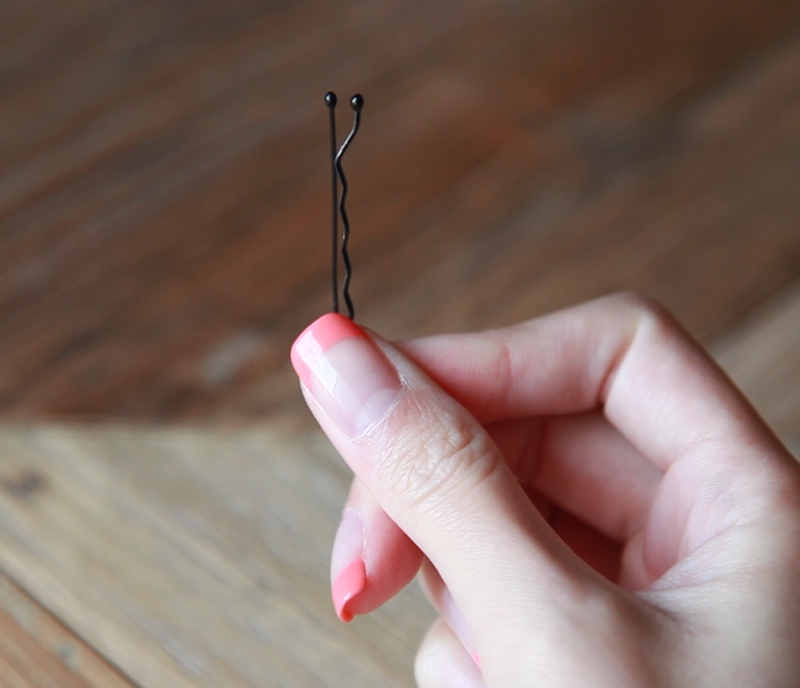
  5. Bobby pin
 photo 1_zps8440f061.png
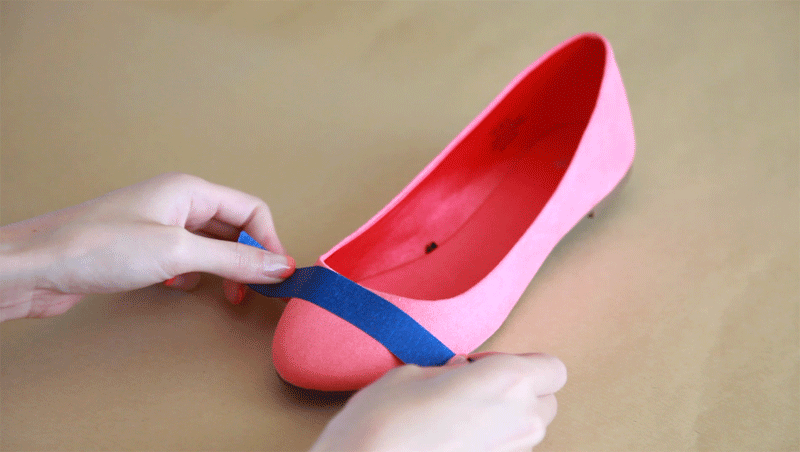
Tape off the top of the flats and remember to press down firmly. We don't want the paint to seep through.  photo 2_zpsa1135b79.png
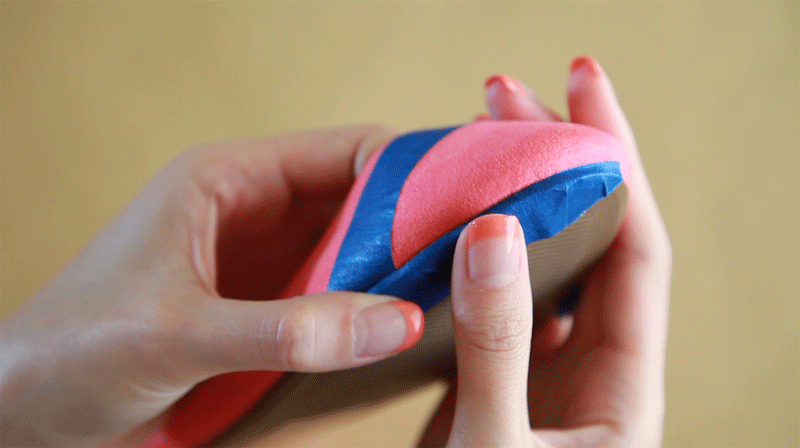
Continue taping along the rim to make sure the paint doesn't touch the non-fabric part of the flats.  photo 3_zpse6a61903.png
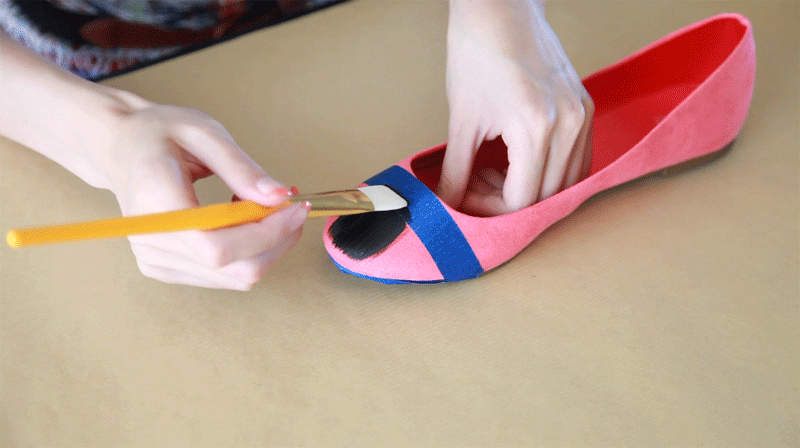
Grab your paint brush and start painting! I did one coat of black fabric paint. Depending on how deep you want the color to be, one coat should work just fine.  photo 10_zps7f12a3b1.png
Carefully remove the tape and paint small triangles for the ears.  photo 6_zps8b5daf6e.png
Grab your trusty bobby pin!  photo 7_zps14118b23.png
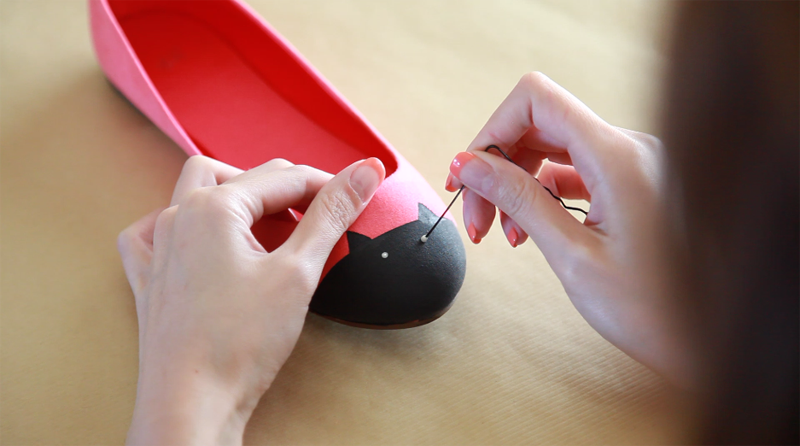
Dip the bobby pin into the white fabric paint and gently poke a dot for the eyes :)  photo 8_zps4b090341.png
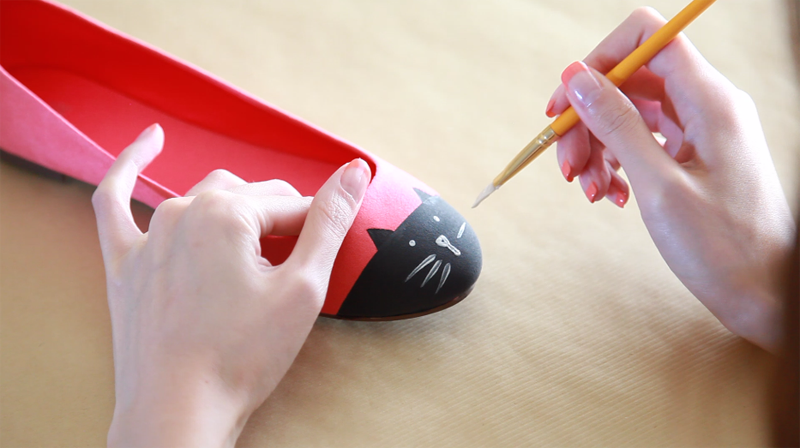
With a small angled paint brush, lightly make short strokes for the whiskers. Don't worry if you mess up, you can always paint over and try again. You can also use white paint marker for finer strokes.
And ta-da! A pair of purrfect cat-toe flats for a playful and casual day out.
Thank you so much for reading, and to Julie for letting me guest post for you all today! Let me know what you guys think in the comments below, or feel free to pop by my blog/channel for more DIYs.

Tuesday, August 27, 2013

Pad Thai Recipe by Studio TAC

"Hello there! I'm Sara, of Studio TAC. Today I'm going to share a Pad Thai recipe with you! Pad Thai is one of Thai well known dishes. It’s actually easy to make but the work is probably more on finding ingredients if you are outside Thailand. If you can find them, great ! You will get the right taste and I also have some photos for you to search for those ingredients. I am pretty sure if you have local Asian supermarkets nearby then you will be able to find them.

You will need:

Rice noodles ½ c
Bean sprouts ½ c
Chinese chive ½ c (cut into 1’’ pieces )
Dried shrimp 1 tbsp
Tofu (cut into 1/4” cubes) 1 tbsp
Preserved white radish, chopped 1 tbsp
Shallots, sliced or chopped 1 tbsp
Egg (optional)

For the taste:
Tamarind juice 2 tbsp (soaking the pulp in warm water until soft and squeeze out the thick juice)
Plam sugar 1 tbsp
Fish sauce ½ tbsp

For the side:
Roasted, chopped peanuts
Chilli powder
Freshly squeezed lime juice
Sugar
Bean sprouts
Chinese chives
For more exotic taste, freshly sliced banana flower (soaked in water and 1 tbsp of lime juice to prevent browning)

How to:
Heat 1 tbsp cooking oil. Fry the shallots and tofu until brown. Add preserved radish and dried shrimp. Add the ingredients for the taste: tamarind juice, palm sugar and fish sauce. Stir well. Put rice noodle, add 1 tbsp water to make it soft and stir well. After this you may want to taste it to add more seasonings, if desired. Add egg, wait until it is half-cooked. Add bean sprouts and Chinese chives and stir well. Enjoy !

If you love cooking, you may like my Pinterest group board here. I also created a board in case you may have questions; just put your comment on the pins here. xo, Sara @ StudioTAC"


P.S. Can I get your vote? :]
Martha Stewart - American Made 2013 - Nominee Badge

Monday, March 11, 2013

Fun Game Idea by Oh So Antsy

I have Jessica from Oh So Antsy here today! She's going to share a game she plays with her boyfriend that make a trip to the grocery store more fun. I really like this idea because grocery shopping is NOT our favorite thing to do. (Which is why our fridge is empty right now) Definitely going to give this a try! Here's Jessica:

"Wanna play a game? This is something that’s said in our house a lot, mostly by Walker (the boyfriend). He loves games and loves it even more when I agree to play. Right now Dominion and backgammon have been on heavy rotation.
For a recent date night (it was actual Valentine’s Day) we had a scavenger hunt at the grocery store. Here’s how it worked. I assigned him an appetizer and I chose the main meal. We both, secretly, wrote down what ingredients we needed and then turned each one into a series of clues or puzzles. Here are a few examples:
A couple of my clues:

1. I am red
2. I come in many varieties
3. I belong to a dangerous family

1. I come fresh or in a block
2. In some cases I’m considered stringy
3. I am white

(I needed tomatoes and mozzarella to make pesto pizza)
A couple of Walker’s clues:

1. A “sexy” veggie
2. “long” and “ridged” and “bumpy”
3. Good with gin

1. Sounds like a winter Olympic sport
2. My favorite colored tank top
3. These babies of the mama line up in a row
4. You wouldn’t want to “bone” this guy
5. One ugly swimmer

(He needed cucumber and salmon to make marinated salmon on top of cucumbers and blue potato slices)

Fun right?! We double checked each other’s baskets and headed home after checking out. We still didn’t know what the other was cooking until it was ready to eat - quite the mysterious dinner. I can’t wait to do it again maybe with some variation - what about a breakfast or a dessert hunt? Do you have any ideas? Come on over to my blog and share them!"

Thursday, February 21, 2013

Map Corkboard DIY by Be Good Natured

Hey guys! We are in full-on "Mom mode" over here. My mom got in Tuesday night and today we are heading to the nursery to find some plants to put in our front yard. But don't worry, my sponsor Dani is here to share a cute tutorial with you guys! It's a really creative way to keep track of where your orders are coming from or where your products are shipping to. I hope you like it!

"Hi there, JAA readers! I'm Dani from Be Good Natured, a new blog where I write a bit about my life, my shop and creating with wool, DIYs and travel stories. I'm a newbie to blogging, and I'm loving it so far. I'm not a newbie to the handmade community, though. My shop, Good Natured, turns two years old in March, and like many of you, I have been creating things all my life. So, I'm pumped to be here sharing a fun DIY with you today!

Since my little shop keeps growing, and I thought it would be really interesting to keep track of where I ship my products.  So, I decided I needed a world map/corkboard so I could mark those places with pins.  Map/corkboards aren't easy to find.  So I made one--and you can too!
You'll need...

A map (you can find inexpensive maps on Amazon)
A piece of lightweight plywood
A roll of cork (or two depending on thickness--available at Lowe's or Home Depot)
Liquid Nails (or another heavy duty adhesive)
Caulk Gun
Spray Glue
Tacky Glue (optional)
Pen
Pencil
Scissors
Small sponge brush
Saw Tooth Picture Hanger
Map Pins
Step 1: Either cut your map to the size of you plywood, or vice versa.  I chose to cut my map, since it was a little large and had a border with flags that I didn't need.  I centered the plywood on the map, traced, and then cut it out.
Step 2:  Cut your cork to size.  I traced around the wood onto my cork. The cork that I had was given to me by a friend.  Cork cracks easily, so take care when cutting. You can find cork Contact Paper and other cork rolls at home repair stores like Lowe's or Home Depot.  Depending on the thickness, you might need two rolls.
Step 3:  Glue the cork to the plywood.  I used Liquid Nails to adhere the cork to the wood.  I spread the liquid nails around with a sponge brush, which you should wash immediately if you plan to use it again.  After the entire piece of plywood is covered in adhesive, carefully press the cork down.  I set another piece of heavy wood on top and let the Liquid Nails dry for 24 hours.
Step 4:  Glue the map to the cork.  After the Liquid Nails dries, it's time to glue the map to the cork.  I used a spray adhesive for this.  I lined the map up with the cork and used binder clips to hold one side in place.  I coated the left side of the map with the spray adhesive, pressed it against the cork and used binder clips to hold it down. (Um, you should use the spray adhesive outside.) I did the same to the other side.  I also used a dab of Tacky Glue on each corner, for good measure.  Again, I set another heavy board on top of the map and let it dry for another 24 hours. 
Step 5:  Attach your picture hanger.  After your glue is dry, you can attach your picture hanger.  I chose a saw tooth hanger, which was simply nailed into the plywood/cork.  Measure and mark the halfway point of your board and attach accordingly. Make sure that the little nails or screws aren't long enough to poke through your map.  I also gave each nail a little dab of Liquid Nails just to make sure the saw tooth hanger was securely attached and very strong.
Step 6:  Pin your map!  Place your pins wherever you'd like to mark.  You could use this map to mark where you've traveled, or if you have a shop like me, mark where you've shipped your product! I just put one pin per location. 
Step 7:  Hang it up!  I also personalized my map with cute little cork letters that you can get in the scrapbook section of craft stores. :)
So what do you think?  Could you use something like this in your home or for your shop?"

P.S. Don't forget to enter the $30 shop credit giveaway to Dani's shop here!!

Wednesday, January 23, 2013

Free Daydream Printable by KV's Confessions

Hey there JAA readers!

I should probably introduce myself - I'm Kristen Victoria (aka "KV") and I blog over at KV's Confessions where I basically spill my guts on life, style, design, and pursuing happiness while dreaming of self employment.
Julie Ann has perhaps been one of my greatest influences in the blog world - she helps me believe that I can someday be successful at doing what I love, too.

Currently my heart is fully submerged in the love of design, but in the day hours you can find me assisting a real estate agent managing folders full of paperwork. Sometimes while I'm clocked in I'll catch myself caught in a daydream, hoping for the day when I'll be a shop-owning-rockstar like Julie Ann ;)

But until then I'm working hard in the late night hours, building my design portfolio, expanding clientele, and fueling my passion off of the belief that one day I'll prove to myself and everyone else that my dreams were real, and not just a fleeting fantasy.

I know lots of people in the blogosphere are doing the same thing - working hard and waiting until it all pays off. Sometimes it can be a tough road and doubt can sink in at any moment - that's why I wanted to pass along this free 5x7" printable I designed for my fellow daydreamers out there.
(Right click for larger image)

Print it out and hang it in your office, fridge, or bathroom, as a way to remind yourself to hold on to and believe in your dreams full force - it's the only way to get where we want to be.

Until then... happy daydreaming! :)

xo, KV

Monday, January 14, 2013

DIY Chalkboard Storage Jars by SewCal Mama

Hi guys! Tia, from SewCal Mama here! I was so excited when I was asked to guest post on Julie Ann Art, Julie is such a huge inspiration in the blogging community so I couldn’t pass up this amazing opportunity! I know how amazing Julie Ann’s readers are so my only concern was living up to her creative standards :)
I decided to share a quick and easy DIY tutorial with you guys, not only because it’s one of Julie’s most popular topics, but because I love creating and sharing my own DIYs! Without further ado, here is my DIY Chalkboard Storage Jar Tutorial:

Supplies

Glass Jars
Chalkboard Vinyl
Scissors
Marker
Decide how big you want your chalkboard labels to be then draw out straight lines on the backside of your vinyl for a better measurement.
Cut out the chalkboard labels and make sure they fit. Adjust as needed.
Next, apply the vinyl stickers to the jars.

There ya go! Now you can start organizing all of your craft supplies without misplacing a thing. Enjoy!
Don’t forget to check out my blog, SewCal Mama for more DIY tutorials like this one.

Thursday, November 29, 2012

Wire Wrapped Rose Ring Tutorial by Misluo

You might remember Yanxia, the girl behind the beautiful jewelry shop, Misluo. Today she is here to show us how to make a gorgeous wire wrapped rose ring! This would make such a sweet Christmas gift!"Hi! I am Yanxia from Misluo and I am so excited to be here today to show you how to make the Wire Wrapped Rose Ring with some basic tools. These rose rings are favored from all ages, so I believe it will be a great idea to make a rose ring for your family or friends as a Christmas gift.
Materials & tools needed:
  • 18-gauge dead soft wire (copper, silver or gold-filled); 20 inches is good for making a ring from size 6-size 8. You will need 1-2 inches more for larger sizes.
  • Ring mandrel (I use a sharpie in this tutorial, which is easy to work with)
  • Cutter
  • Chain nose pliers
  • A fine file (nail file will do)
Decide the size:
First of all, you need decide which size you want to make. You may use this instruction to find out your ring size. Choose something as mandrel one size larger than the intended size because the shank will shrunk smaller while wrapping.
Let's start: Hold the center of the wire against the sharpie and wrap each wire end one time around the sharpie. It should look like this (above). Twist the two wire ends together. I twist it by hands as the dead soft wire is easy to bend. You can use the pliers if you feel hard by hands. And... keep going to twist the wires around the center point. You need cross the two wires sometime while twisting to create a tree-dimensional  rose. Leave about half inch wire at each end. You can cut the wire short if it's longer than you need. Now take the ring out from the sharpie and use the file to remove any sharp edges on the wire ends. Run your finger gently around the end to see if it's smooth enough. Use the pliers wrap the wire ends on the side around the shank tightly. Try to hide the wire ends under the rose possible. This pliers in the photo may mark your ring. Here I have two options for you. You can use some taps wrap the tip of the pliers to minimize the marks. Or, you can use a jewelry file and fine sanding papers to remove the marks. I would take the first one because it's easy and the second one need a lot work to do and you run a risk to get a lot new marks if you don't have the right tools. Actually, most of us don't mind some tiny marks around this beautiful rose. One of my customer told me it will "make the rose look more real and unique", she brought the ring  at the summer market in Rimini Italy. By now you should have a pretty rose ring, right? If you have any questions, just ask! :)"

Wednesday, July 11, 2012

Make Your Own Envelopes by Little Daily Miracles

Hello dear Julie Ann Art readers! My name is Aleksandra, and I blog over at "Little Daily Miracles". I spent a lot of time thinking about what I could show you, but since a few days I was pretty sure what it will be about. So... I'll show you how to make awesome vintage letter envelopes. Yup, simple as that. Some nice vintage ones. Well, I always loved discovering things by myself, and how they were made, and since I'm writing letters again (yippie yaay!), I found that I need more pretty envelopes! And, I've been in all kind of paper stores, from the very elegant office to the shabby chic ones. Well, yup, here and there were some which could be ACCEPTABLE, but for this occasions I needed something special. Very special. So I decided to give it a chance and try it to make some myself.

So everyone, let's go ahead and jump into everything!
So, the main things that you will need are scissors, some glue (doesn't have to be the stick one, but I perfer it over all others for such simple things), a mechanical pencil and an eraser.
Next thing you will have to think about is what kind of paper you want to use for your little envelope! Here you have the complete freedom of your imagination, you can use WHATEVER you want. Here are some paper goodies I had to choose from.
Then you simply need to choose a regular envelope of size and shape you like. This one you see above I actually planned to use, but then it somehow got dirty, and I couldn't anymore. But without that little accident I wouldn't get this idea!
After you know which envelope you will use, you simply need to disassemble it like shown in the picture above.
... then you take your simple envelope and place it on top of your chosen paper...
... and draw the contours of it.
Afterwards you cut it out. And now comes the fun part! The folding!
Firstly begin with the side parts...

...followed by the bottom part and the upper one.
Now it looks like something!
Now you need to glue the bottom part of the envelope to the sides we folded at the beginning. I think the best way to do this is to apply the glue at the edges of the sides of the bottom part. So you don't glue the back of the envelope unintentionally.
You need to put some pressure on the spots where you've applied your glue. Hold like that for a few seconds, because we don't want our nice letters to fall apart on its way to its receiver!
And now it comes to your creativity... You can decorate your letter with whatever you want... Some stickers likeI did, some masking stickers perhaps or some deco tape. It's all up to you!
And the final result! Simple as that! 
 Here are some other examples of how it can look like. I kept it pretty simple but you can do with it whatever pleases you!

I hope you enjoyed this as much as I did while making it.. And I hope it helps! Until next time!

Love, Aleksandra.