Showing posts with label Guest Blogger. Show all posts

Tuesday, January 8, 2013

Blogging Advice from Casey Wiegand

I'm not sure today's guest blogger needs an introduction. Casey, of The Wiegands, has quite the presence in the blogging community! Casey and I are two very different people with very different lives, but there's something about Casey that makes me feel connected to her, and that is her ability to be open and vulnerable on her blog. I've mentioned before how this is something I struggle with. It's very inspiring to see someone else do it so well. I asked Casey if she would give some insight on how to be more open through blogging.
"If you have followed me for awhile you know that I have a mentor.
She is absolutely amazing and has walked along side me through many many decisions and many many things. She is incredible and recently did a post about "rethinking blogging for 2013. I love it and I think it is good to refocus at the beginning of the New Year. I started this blog "CaseyLeigh" 2 years ago this time. I took a random family blog that I updated here and there for grandparents and transformed it. It was a New Year's resolution. Ironically the first blog that I ever found, loved and followed- Take Heart just this week said

 "in case i haven't convinced you to start a blog yet… start a blog. i promise it is the best new year's resolution for you this year. it is much more rewarding than losing twenty pounds… i think. i mean, i haven't lost twenty pounds yet but i do blog. so just go with it. it could be private, it could be public. you could write once a day, once a week, or once a month. one person could read it, or one million people could read it. the important thing is that you tell your story. the important thing is that you don't forget. the important thing is that you wrote it all down so your kids can read it all one day. the important thing is that you share what you're passionate about."

Love this. Yes. Tell your story.
I often get emails saying things just like this: One thing that I struggle with on my blog is being open and true to myself (I'm working on it but it's hard to not feel like I'll get judged)

My advice is- I do get judged. There aren't always nice things said.
Being vulnerable is scary because people aren't always kind with it.
But the truth is I believe that people need to hear our stories. Our voices and heartaches and stories being shared help people. When I wrote about losing our baby, at the time, it was an outlet for me. I was just writing to get through the emotions. To process.

But you know what, I had no idea that over a year later I would still get daily emails of women walking that road. You get to leave a "footprint"... what footprint do you have to leave? It can be anything. God has gifted everyone with talents and passions and sharing those is so important.

Living out your purpose.
and sharing your journey along the way."

Wednesday, May 23, 2012

Etsy Friendship Bracelets by Ciera Design

Hi y'all! I'm Ciera and I blog over at Ciera Design about my adventures as a freelance graphic designer and everything that inspires me as an artist! I'm so happy to be guest posting today on Julie Ann Art.

I have always loved the bright colors of friendship bracelets so I started looking through Etsy to see what was out there. Truthfully, I was not expecting to find so much awesomeness! I mean, look at these bracelets! I think these would make great gifts for any occasion, I want to get them for everyone I know! I hope you all enjoy this collection of handmade friendship bracelets!
Friendship Bracelets
Do you have a favorite?

1 Ana Osgood Jewelry // 2 Nautical Wheeler // 3 Koko & Beau // 4 It’s Me, Mary // 5 TINNLILY // 6 Nautical Wheeler // 7 Simply You Jewelry // 8 Ana Osgood Jewelry

Wednesday, May 9, 2012

French Chocolate Cake Recipe from HappeeMonkee

You guys are in for a treat today! One of my sponsors, Mable, of HappeeMonkee is here today to share an amazing French recipe (one that looks so fancy that I'm scared to tackle it with my minimal kitchen skills!). Enjoy!

I first started food blogging out of boredom. My baking skills back then (2007) was pretty non-existent but I decided to teach myself how to bake as a challenge. One of my favourite recipe books is by Carole Clements and Elizabeth Wolf-Cohen - French: Delicious classic cuisine made easy. I stole it from my brother and I'm sure I got more use out of it than he did.
French Chocolate Cake ( serves 10 – 12)
---------------------------------------------------
3/4 cup icing sugar
280g dark chocolate, chopped
3/4 cup unsalted butter, chopped
1 tsp vanilla extract
5 eggs, separated
1/4 cup of plain (all-purpose) flour, sifted
pinch of salt

Method:
1. Preheat the oven to 190°C. Generously butter a 9½-inch springform pan, then sprinkle the pan with a little sugar and tap out the excess.
2. Set aside 3 tbsp of icing sugar and place remaining sugar in a saucepan with the chocolate and butter over low-heat.
3. When the ingredients has melted and dissolved, remove the pan and stir in vanilla extract. Let mixture cool slightly.
4. Beat the egg yolks into the chocolate mixture, beating each in well, then stir in the flour.
5. In a clean grease-free bowl, beat the egg whites slowly with an electric mixer until they are frothy. Increase the speed, add the salt and continue to beat until soft peaks form.
6. Sprinkle over the reserved sugar and beat until whites are stiff and glossy.
7. Beat one-third of the whites into the chocolate mixture, then fold remaining whites.
8. Carefully pour the mixture into the springform pan, tap the pan gently to release any air bubbles.
9. Bake the cake for about 35 – 45 minutes until well risen or when skewer comes out clean.
10. Transfer the cake and let cool completely.
Chocolate Ganache
---------------------------------------------------
8 ounces, or approximately 230g semi-sweet chocolate, chopped
1 cup heavy cream
2 tbsp brandy or run
2 tbsp unsalted butter, softened

Method:
1. To make the ganache, bring the cream to boil in a heavy saucepan over medium-high heat.
2. Remove the pan from the heat and add chocolate all at once, stirring until melted and smooth. Stir in brandy or rum and beat in softened butter.
3. Set aside for about 5 – 10 minutes to thicken slightly. (Ganache should coat the back of a spoon in a thick smooth layer)

To Assemble:
Pour the warm ganache over the cake all at once, titling gently to help spread it evenly on all surfaces. Use a spatula to smooth sides, decorate with a sprinkle of chopped pistachio nuts (¼ cup).

Enjoy!

Monday, April 23, 2012

Newspaper Graphic Art Tutorial by Two Hoots + A Holler

Hi Julie Ann readers! I'm so excited to be over here today.  My name is Mae and I blog over at Two Hoots & a Holler.  
Today I'm going to show you the easiest craft ever, inspired by this photo I found on Pinterest:
source
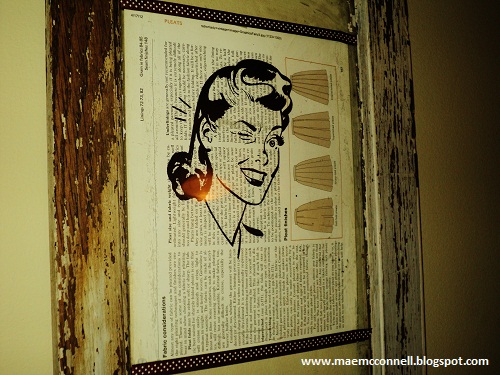
I'm a huge fan of the 1950's retro style (who isn't?) and when I saw these images on the Graphics Fairy, I knew I had to use them.  Remembering the book art I had pinned above, I quickly tore pages out of an old sewing book and got to printing.
I then used an old window I found in my mom's barn as the frame.  I used ribbon to add a border around each print and voila!  Easiest craft ever.
And just because I'm a huge fan of interactive art, I put a jar of dry erase markers beside the frame and encourage guests to add their own dialogue box to the images. 
This kind of book art is SO easy it feels wrong and the possibilities are absolutely endless.  Go find some images you like, a book or newspaper you don't want anymore, and happy printing!

Thursday, April 19, 2012

Ombre Nail Tutorial by Anna Delores Photography

Greetings, Julie Ann Art readers!  My name is Emily and I'm visiting from the Anna Delores blog.  The amazing (as you already know) Julie Ann agreed to let me share a fun nail trend that is also really, really easy to execute: ombre nails.

The ombre manicure made its appearance as a hot trend last summer, and it's back and better than ever for 2012.  You can go matte, shimmer, glitter, or merge colors on one nail with sneaky makeup tool tricks -- but I'm giving you the EASY version today, just to get you started.

When I first saw this trend, I thought I'd need five different polishes in the same color family, just lighter and darker versions of each other.  I knew I had enough polishes to make it happen (I think I have 15+ polishes just in pinks), but shades can vary so much -- some are warm tones, some are cool tones, some are shimmery, some are matte, etc.  But THEN I realized: all you REALLY need is one dark polish and one white polish.  See where I'm going with this?
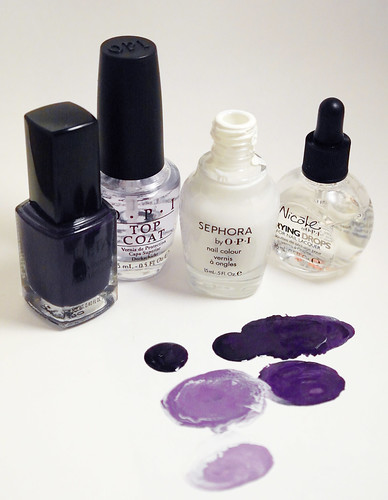
For my color inspiration, I decided on "Devious," a midnight purple shade in a creamy matte (no shimmer) that I got from Ulta (whose eponymous nail polish is buy one, get one free right now!).  For white, I used Sephora by OPI in "A-ha! Moment," a bright opaque white.

Perhaps this is obvious, but I recommend doing all your manicure prep before pouring and mixing colors, as once you measure out your polish, it (of course) starts to dry.  Because I got excited and poured my polish before applying my base coat (Nicole by OPI Base Coat Plus), the polish was a little thick and had already started to harden when I was ready to apply.  My end result wasn't as tidy as it should've been, since I was negotiating with half-dry polish.  Yuck.
Measure out four dollops of your dark polish (I originally did five because I was thinking, five fingers, right?  But for the fifth one, you can use the original color out of the bottle, of course!  Duh, Emily). Add drops of white to each, one at a time -- mix as you go so you can see if you need to go lighter or darker, and adjust the remaining "swatches" accordingly.  I had to fuss with mine a little to get the right gradient of colors.
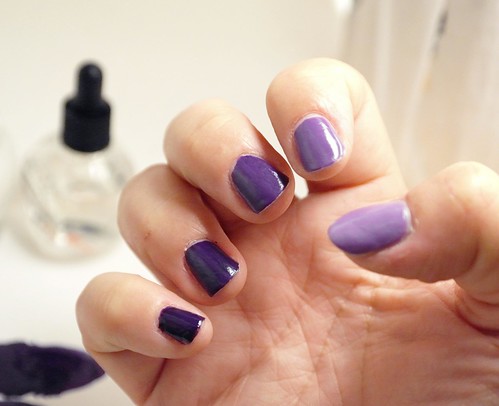
And voilĂ !  You've got your ombre palette.  You can start at whichever end you like (your pinkie or your thumb) -- I opted for starting dark on my pinkie and then working my way over, but you can do it the other direction, too, of course!  It's up to you.
And that's that!  I TOLD you it was easy.  Finish with your favorite top coat and some lacquer-drying drops (just 1-2 drops per nail) -- I used OPI Top Coat and Nicole by OPI Drying Drops.

You can do this with pretty much any color as long as it's dark enough to begin with; the darker the shade, the greater your flexibility in making the gradient as dramatic as you like!  I could've gone a lot lighter on my thumb color and thus had a more dramatic dark-to-light transition (as it is, the shades on my pinkie and ring finger look almost the same unless you're examining them in bright sunlight!).  I like the subtlety of a tame gradient, but experiment with the colors and make it your own.

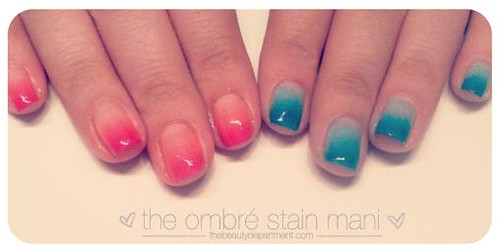
A few other color ideas to whet your whistle (and don't you love that glitter?):
And this is a whole other level (I think this is the true 2012 reincarnation of the ombre nail, but I'm just not ready yet):

Enjoy, and let us know if you try this out!  And come say hello!

xo,
Emily

Tuesday, April 17, 2012

Homemade Strawberry Jam by Darkroom and Dearly

Hi, friends! I'm Brittany from Darkroom and Dearly, and I'm so excited to be guest posting for the lovely Miss Julie Ann today!

Since summer is fast approaching (unless you live in Portland like I do, wherein you shouldn't expect the sun to come out until July...) I wanted to share with you one of my family's favorite May traditions: making strawberry jam!

Not only is the recipe very simple, but the process itself is so delightful. Each year we cheerfully head out to the strawberry farms, baskets in tow, expecting to fill our totes, stain our fingers, and return home to spend the afternoon canning fresh strawberries (the ones we haven't eaten already, that is!) Every year we think we'll stop at one or two baskets, but the ripe strawberries beg us to keep picking, and inevitably we return with thirty pounds or more and the slightly guilty feeling that perhaps we didn't need quite that much fruit.
At any rate, there's hardly anything better than strawberry jam, and with thirty pounds of fruit, you can even use the leftovers to make breads, pies, dessert toppings, pancakes, and cakes if you happen to run out of canning jars. (Heaven forbid!) Then again, perhaps you have stronger will power than us, and you'll stop picking before you hit the weight capacity of a small pony.

Here's the recipe for a simple no-heat strawberry jam. It turns out somewhat runny, but still delicious. If you'd rather have a more jelled jam, a boiled pectin recipe works well, but it tends to be a much messier/ time consuming process, so beware.
{homemade strawberry jam}

4 cups crushed strawberries 
1 1/2 cups sugar 
1 1.75 oz pkg Freezer Jam Pectin (Usually in the baking/ canning aisle at the grocery store)
1 16 oz Ball Freezer Jam jar (I recommend buying a pack)

Put strawberries in a blender and blend until smooth. In a medium bowl, stir together sugar and package of pectin until well mixed. Add the strawberries and stir for 3 minutes. Transfer mixture into clean freezer jar. (Leave a little space at the top since it will expand when frozen.) Twist on lid and allow to stand at room temperature for 30 minutes to thicken. Freeze until ready to use.

This is for one 16 oz jar of jam. If you're like us and pick 30 pounds of strawberries... you may want to 30-tuple the recipe and buy pectin and jars in bulk. Just sayin.
Best of all, you get to enjoy a day in the fields with the sun and the strawberries! Have fun, and happy early summer!

Thursday, March 29, 2012

Zucchini Tomato + Ham Fritatta Recipe by TheLetter4

**Hi friends! I'm currently in Australia, swimming with sea turtles and singing at the Opera House. In the meantime, please show some love to this week's fun guest bloggers! I'll be home soon (hopefully with a kangaroo in my possession.)**

"Hi there Julie Ann Art readers! Although I'm always happy to be on one of my favorite blogs, I have to say that it's pretty unfair that Julie keep leaving us to these dream wedding destinations. Not cool. Just kidding! At least we'll get to watch an amazing wedding video and live vicariously right? :)

My name is Jamie and I am one of the sisters behind The Letter 4. Our blog is our little space where my sisters and I can share stuff with each other again. Between projects, recipes, outfits, art, and just plain life you can find pretty much anything at our blog!

I have the sweetest little daughter named Sabrina, but the girl is one picky eater. I've had to get creative and dig deep into old cookbooks to get her to eat anything. This Zucchini Tomato and Ham Fritatta luckily had the two things in it I know she won't turn down. Ham and eggs. Weird I know! The girl likes Chinese food! She has never turned down an egg roll or egg fried rice. But this recipe sneaks some other veggies in there and is amazingly good and almost impossible to mess up.
What you'll need:

2 tbsp veggie oil
1 onion , peeled and chopped
1 zucchini, sliced
1 tomato, chopped
4 eggs
1 tbsp of milk
Parmesan Cheese

Heat oil in frying pan. Add onion and zucchini, season lightly, and cook for 15 minutes. Add tomatoes and ham, cook for 3-4 minutes. Beat eggs with milk and pour over veggies & ham. Cook over medium heat for about 5 minutes, or until the eggs are set. Sprinkle with parmesan.

Enjoy!  You can find more recipe and other projects over at our blog!

Can't wait to see your photos and videos from you excursions Julie! xoxo"

Wednesday, March 28, 2012

Spring Outfit by Shannon Hearts

**Hi friends! I'm currently in Australia, swimming with sea turtles and singing at the Opera House. In the meantime, please show some love to this week's fun guest bloggers! I'll be home soon (hopefully with a kangaroo in my possession.)** 


"Hello Julie Ann Art readers!  My name is Shannon and I'm from Shannon Heart's.  I am so excited to be here with you today.  With the warm days of spring quickly approaching, I thought I'd share one of my favorite spring looks.  In this look I combined a silky maxi skirt with a layered sweater.  I love maxi skirts because they are wonderful transitional pieces between seasons.  You can wear them with boots and a warm sweater if it's chilly, or wear sandals and a tank top if it's warm.
Top: Free People, Skirt: Rebecca Taylor, Necklace: Rumble and Spur
Bracelet: c/o Jewelmint, Shoes: Seychelles

I think my favorite color is purple.  Then again, my favorite color changes everyday.  There are so many pretty colors it's hard to commit just one favorite.  In the springtime, I am much more adventurous with the colors in my wardrobe, and I love to wear brighter hues.  It's fun to mix and match bold shades together, like in this look I mixed purple and mustard.

I hope you are all enjoying the change in seasons!  Thank you so much for having me on Julie Ann Art today.  It's been a pleasure.  Feel free to pop by my blog anytime and say hi."

Monday, March 26, 2012

Kombucha Wine Spritzer Recipe by The Skinny Confidential

**Hi friends! I'm currently in Australia, swimming with sea turtles and singing at the Opera House. In the meantime, please show some love to this week's fun guest bloggers! I'll be home soon (hopefully with a kangaroo in my possession.)**

"Hi pretties! Not going to lie, I am pretty excited to be a guest blogger on Julie Ann's fabulous, crafty blog. First, let me introduce myself, I'm Lauryn Evarts, creator of The Skinny Confidential. It's a blog that is all about diet modifications, healthy food substitutions, and easy, quick workout tips. The site is all about having your cake, and eating it too! I also have a store with tons of girly, fun trinkets. Check it out here!
Let's be clear: I love to cook, I love to eat, and I love to drink. I just do a delicious, healthy way. Since the weekend is around the corner, I figured these Kombucha Wine Spritzers would be a perfect cocktail to share. It's low on sugar, calories, and totally yummy. I just recently made this drink recipe for friends and they fell in love immediately. My favorite Kombucha is the guava flavor [ the pink one ; ) ].

6 ounces of Pinot Grigio [ I like this one ]
3 ounces of a Kombucha tea [ Trilogy is my favorite ]
3 large ice cubes
1 squeeze of lemon

Pour white wine over ice. Add Synergy Kombucha of your choice. Squeeze lemon. Throw in a few berries for an added pop of color. Paper pixy stick straws are found here. Cheers!
Side note: everyone will want a taste; my chihuahua, Pixy, is always trying to get a lick of whatever I am drinking & this happens to be her choice cocktail too.

This weekend you'll find me sweating it out, relaxing, and enjoying one of these bad boys. I mean who doesn't love drinking extra nutritional benefits with their wine?!"

Thursday, February 2, 2012

Guest Blogger: Acute Designs

Hello everyone!  My name is Gina and I blog over at {Acute Designs}.  I am so happy that Julie Ann asked me to guest blog while she was busy focusing on the Valentine's Day rush in her shop....

Speaking of Valentine's Day, how about a super simple, no-cooking-skills-required chocolate treat?  Yeah, I thought so..... =).
As cheesy as it may be, I love a heart shaped box of chocolates.  There is something so fun about all the different flavors inside that red foil package.   The one problem?  I am super picky and pretty much only eat the caramel and fudge filled chocolates.  The rest get thrown away.  I know, I know I could just buy a pack of Rolos.....but it's not the same thing.

My solution to this little problem was to make my own chocolates and fill them with all my favorite flavors.   So, I created little chocolate cups, filled them with a few of the best things one can pair with chocolate and voila - a box of chocolates customized for my very favorite Valentine - me!
You can choose any fillings you love.  I like to mix it up and experiment, but my tried and true favorites are:
  • Caramel - of course
  • Peanut butter - peanut butter + chocolate = a match made in heaven
  • Banana - delicious and, umm, healthy....
  • Pretzels - I love the sweet + salty combo
  • Strawberry jam - nothing better than strawberries + chocolate
Supplies Needed:
  • dark or milk chocolate {2 standard sized bars will make about 24 cups}
  • mini muffin paper cups {you can find these at the craft store or at some grocery stores}
  • filling ingredients {unsweetened peanut butter, graham crackers, powdered sugar, caramel sauce, strawberry jam, a banana, and pretzels}
Step One - Melt the chocolate
Break up one bar of chocolate into small-ish pieces and microwave.  I set my microwave on 40 seconds, give the chocolate a stir, and then let it go for another 30 seconds.  Stir again, and let it go for another 15 seconds...or until melted.  

Chocolate has a tendency to burn, so make sure you are checking it and stirring frequently.  I melt one bar at a time so that the chocolate doesn't harden while I am working.
>
Step Two - Make the chocolate cups
Set your mini muffin cups out on your work surface.  Working with one paper cup at a time, spoon a little chocolate in the bottom of the cup.  Take a little more chocolate and "paint" it around the sides of the cup so that the entire thing is covered.  Be generous here since this will be the base of your chocolates and will need to hold all the fillings.
Once you have all the paper cups filled with chocolate, you will have to put them in the refrigerator for about 30 minutes to set.   I like to put my filled cups into a mini muffin pan and then slide the entire thing into the fridge.  If you don't have a mini muffin pan, you can just use any tray that will fit into your fridge.
Step Three - Make the fillings
There is very little "making" happening here; it is more like stirring and opening jars.  Feel free to fill your chocolate cups with anything you love.  Below are my personal favorites!
  • Peanut butter - mix 1/2 cup creamy unsweetened peanut butter with two crushed graham crackers and two tablespoons of powdered sugar.
  • Caramel - I use a jar of caramel sauce {this one is my favorite}
  • Banana - Just mash up a banana.  Add a little honey if you want it extra sweet.
  • Pretzels - Simply crush up about a half cup of pretzels.
  • Strawberry Jam - I use store bought jam...any brand will do!

Step Four - Fill the chocolate cups
Remove the tray of set chocolate cups from the refrigerator and fill with your choice of fillings.  Leave a little room at the top and spoon melted chocolate over the top to "close" the cup.  Pop each finished one back onto your tray.  When all the cups are filled - put the tray back in the fridge and allow them to set for another 30 minutes before eating.
**These chocolates are best stored in the refrigerator and will last about 4-7 days {depending on the filling}.   If you want a frozen treat - the bananas ones freeze beautifully and will last a couple extra weeks if frozen.  

Enjoy and Happy Valentine's Day ♥

Wednesday, January 25, 2012

Guest Blogger: Casey Wiegand

Hi there! Today's guest post is from the lovely, Casey Wiegand. Have you met her yet? Go visit her blog, she is an amazing writer and artist!

Hi! My name is Casey Wiegand, I am a freelance artist, wife and mama. I love painting and sharing our life through my blog...where you can expect pieces of my perspective on life, faith, kids, marriage, with touches of art, creative inspiration, projects and things I love along the way.
I will begin at my highschool graduation
(where it all began....sort of).

Chris is 4 years older than me so he was at my highschool graduation with his current girlfriend at the time (they were watching her little sis graduate). I am not sure how this came about but he asked who I was. smiley face. She told him... that is Casey Jones and she'll be at Baylor next year. I graduate, make it to Baylor and Chris can name countless times that we were at the same places... always remembering who I was from that initial sighting. My sophomore year he sat behind me at a concert and tried to get the courage to talk to me the whole time and never said a word. Fast forward time....(he is older) he graduates, moves back to Dallas. I still don't know he exists and we have still never officially met.
*Another funny sidenote. Some of Chris' friends from college live right near my parent's house so he would always drive past hoping to see me. :)

I graduate college in August. One night Chris was at a highschool football game with a bunch of guys and my little brother, Travis, walks up to the group. Chris asks who that is..."Casey Jones' little brother" (so I am back on his mind)...then later that evening we both randomly wind up at a Kanakuk reunion. He waited at the bottom of the elevators to talk to me and I took the stairs!
Finally he decided just to get my number and call me. What was supposed to be a phonecall for a "sort-of" blind date turned into hours of conversation. I didn't even know what he looked like at the time. I remember when I went to answer the door, my heart literally stopped....I could not believe someone so handsome and so sweet was standing there.

I tend to be a bit of a homebody. And I remember my brother saying to me one day - "youre never going to meet anyone staying home all the time"... and my response was, God knows me, He knows how I tick... if He must, He will bring him to me.

And He did!
He took me out on a date on October 21. I remember thinking I was in serious trouble because there was such an instant connection. We are both artists, see the world very uniquely, have interesting personalities with very specific needs.

Three months later he told me he loved me and wanted to spend his life with me.

We went to Hawaii after 5 months of dating and he proposed to me on our one year anniversary.
We had an 8 month engagement, married on June 16...
I was 23 years old.
We started our business/studio when I was 24.
We had Aiden when I was 25, Ainsleigh at 27 and a miscarriage with Addison at age 28.
And here we are today.
There is obviously a lot that has happened in the middle. We have had some messy patches, hard patches, ups & downs. I have let him down a zillion times and he has done the same.

But at the end of the day... Christopher has always said
"There was only girl I could spend my life with...and that's you."

And I believe it.
Through better or worse.
He has made all my dreams come true.
He has changed my life.
He has loved me well.
He has made me a better me.
Through day in and day out.
He chose me. And I am thankful.

Our story :).